Strawberry C'thulhu Pie Toppers
Posted on August 17 2016


From the depths of R'lyeh rises... a taste sensation!
I know it's suppose to be the "August of Pies that don't Look Like Pies" but I can't get into my kitchen today (renos going over time, its a whole thing, I don't wanna talk about it.) But! Necessity being the mother of invention and all, I stumbled upon a whole new category of pie art that I like to call "Pie Modding" - aka, modifying existing, prebaked pies to amp up their awesomeness/geekiness. These C'thulhu mini pies were born of that need, and they are super cute, super fast, super cheap and super easy to do too! No really.
Here's how we do.
Time to create:
- 20 min
Ingredients:
- really big fat strawberries
- any premade mini pie or tart
- chocolate balls
Supplies:
- a sharp little knife
- cutting board
- a paper and pen (or computer, if you don't favour such archaic devices)

Step 1 - Design your strawberry cutting blueprint...
...or just use mine (with a link back if you'd be so kind :)

I like to keep things simple when I can, so I designed this pattern (using my paper and pen) so that each C'thulhu only needs one large strawberry to be called forth into unholy existence.
Step 2 - Chop the strawberries into the 3 main pieces

There are three main segments to this design: the wings, the tentacles, and the head. Trisect the berry vertically, roughly even thickness for each segment.
Step 3 - Cut out the wings


The largest of your two end pieces (if you have a largest) will be your wings. Start by cutting it in half. Then cut out a little scoop shape near the top to define the claw on top of the wing. Finally, cut two swoop shapes on the other side for the bottom of the wing scallops.
Be careful not to cut too close into middle! These wing bits need about 5mm of clearance to maintain structural integrity. Then again, if you do accidentally mangle it, just throw it in the scrap pile and grab another berry. Its a strawberry, not a diamond. Don't beat yourself up. Unless you think that will please C'thulhu (and it might.)
Step 4 - Cut out the tentacles


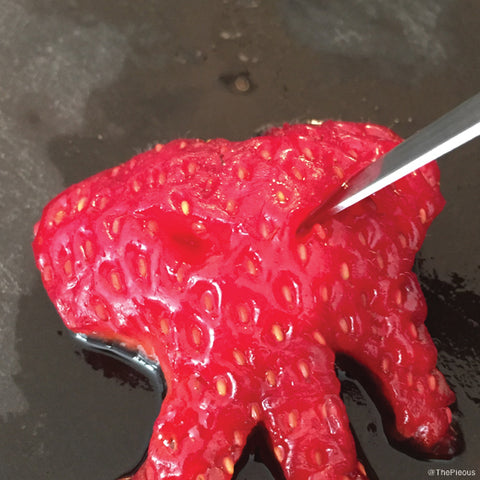
Ever filleted a fish? Me neither. But I imagine this is similar. Cut off two long strips on each side as close to the edge as you can get without breaking it. Again, if you break it, just get another one.
Step 5 - Cut out the head

Start with cutting two scoops on each side near the centre line to define the head part from the mouth tentacle part.
Next, carefully cut the bottom half into three pointed strips (or five, if you've got a really, really big strawberry)

If you've got a wonky shaped berry, feel free to trim around the head a bit until you are happy with the shape. When you're good, go ahead and cut two slits for the eyeballs.
Step 6 - Pop in the eyes

Don't worry if your chocolate balls are different sizes - a little wonk eye adds to the creepy factor! Cram 'em in there. No magic to it.
Step 7 - Put a "scrap" berry on the tart if more height needed


The butter tarts I bought were a bit sunken in the middle, so I pumped it up a bit with some berry scraps to make the head easier to see above the rim.
With my mini pie, I already had a nice dome shape to work with, so I didn't need to worry about using scrap berry bits for height there.
Step 8 - Place the C'thulhu pieces
Place the wings on first.

Then the large tentacles.
Then the head.

Use scrap berries to bump up any areas that need bumping up, and adjust the tentacles until you are happy with the final design.
Step 9 - Plate and serve!


Impress your friends at your next Necronomicon book club and nibble the night away on these yummy C'thulhu strawberry tarts as you wait for the Old Ones you're invoking to come nibble you!

So easy! I think I'll experiment with more "pie modding" in the future - it's fast and fun. When I do, I'll post 'em here under the tag "PieModding" so keep an eye out.
If you liked this tutorial please let me know with a comment below and give us a tweet, pin, instagram, etc. (buttons below.) As always I love to hear your feedback, ideas for future pies, and if you take a stab at making this design or any other pie modification, lemme know and I may feature you on my Ins-pie-ration blog!
Thanks for reading :)
π > ∞
Jessica (aka @ThePieous)


0 comments